Configuring Hybrid Linked Mode (HLM) for VMware Cloud on AWS
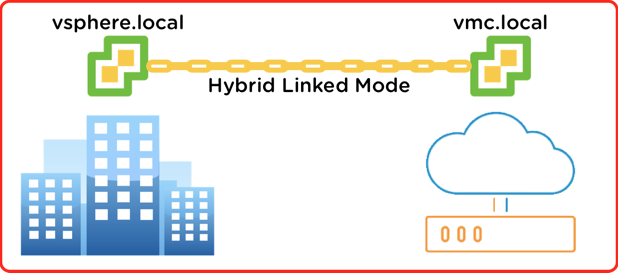
Hybrid Linked Mode (HLM) is a brand new feature available only for VMware Cloud on AWS (VMC), which was announced during VMworld US in August 2017. HLM provides the ability to extend an administrator’s management view from on-premises to VMC. This may sound oddly familiar if you are using Enhanced Linked Mode (ELM) in your on-premises environment. There are differences between ELM and HLM in their requirements, how they work, and what problem each is solving. William Lam has a post outlining the differences between the two features here. This post will go into detail on how to get HLM implemented.
Overview
Before jumping into the configuration of HLM it’s good having an understanding of the feature and its requirements. When a Cloud SDDC is deployed (a Cloud SDDC is an SDDC consisting of vCenter Server, ESXi, vSAN, and NSX deployed in the VMC on AWS service) and configured it is setup as its own stand-alone vSphere Single Sign-On domain. In order to manage both a VMC and your on-premises vSphere SSO domain together, these two separate SSO domains need to establish a trust. They also need to continue to retain their autonomy since HLM has the flexibility to be created and destroyed at will. For example, if we create HLM between a Cloud SDDC and an on-premises vSphere environment, we don’t want the two environments to become fundamentally dependent on each other. This gives us the ability to tear down HLM without breaking permissions and creating a huge mess.
HLM is a flexible solution that allows us to jointly manage both the VMC and on-premises SSO domains. HLM provides a one-way trust from on-premises to VMC (i.e. VMC trusts the on-premises users) and gives us the option to link and unlink as needed. It also retains the separation between on-premises and VMC permissions to avoid a mess if we need to break the two environments apart. Once HLM is established, on-premises workloads can be migrated to VMC. The added bonus is that the migration works both ways and workloads can be migrated back from VMC to on-premises.
Now let’s take a look at the features and requirements of HLM.
Features
Update: November 28th release of VMC, HLM now supports external vCenter Server deployment on-premises.
- The initial release supports embedded vCenter Server deployment model for both VMC and on-premises.
- Not setup by default with an option to link and unlink as needed.
- Configuration done in the VMC vSphere Client (HTML5).
- Management of both environments is done by logging in the VMC vSphere Client using an on-prem account.
- One way trust from on-prem to VMC.
- Supports round-trip workload mobility via cold migration.
Requirements
- vSphere 6.5.0d (build 5318154) or higher is required for the on-premises embedded or external vCenter Server Appliance deployment.
- VPN connectivity from the VMC management gateway to the on-premises environment.
- Configuration of firewall rules from the VMC management console. By default, the firewall is set to deny all. Also, the necessary firewall ports need to be already opened in the on-premises vSphere environment.
- A user account that has authority to add an identity source. Supported identity source types are Active Directory over LDAP(s) or Open LDAP.
- Create or use an existing cloud administrator’s group from the on-premises identity source which will have access to login the VMC vCenter Server and manage both environments once HLM is configured.
- vSphere SSO on-premises environment account information to link to the on-premises environment.
- Platform Services Controller FQDN
- SSO Domain Name
- SSO User Name & Password
- On-premises DNS server entries – these are used to resolve the on-premises identity source and Platform Services Controller.
While you may be thinking there are currently some limitations to HLM, remember VMC is a managed service. This is what’s available in the initial release and additional enhancements will be added to the service over time.
VMC Console
- Before HLM can be configured, there are a few prerequisites which need to be in place prior to attempting configuration. A VPN connection must be established between the VMC management gateway and the on-premises environment.

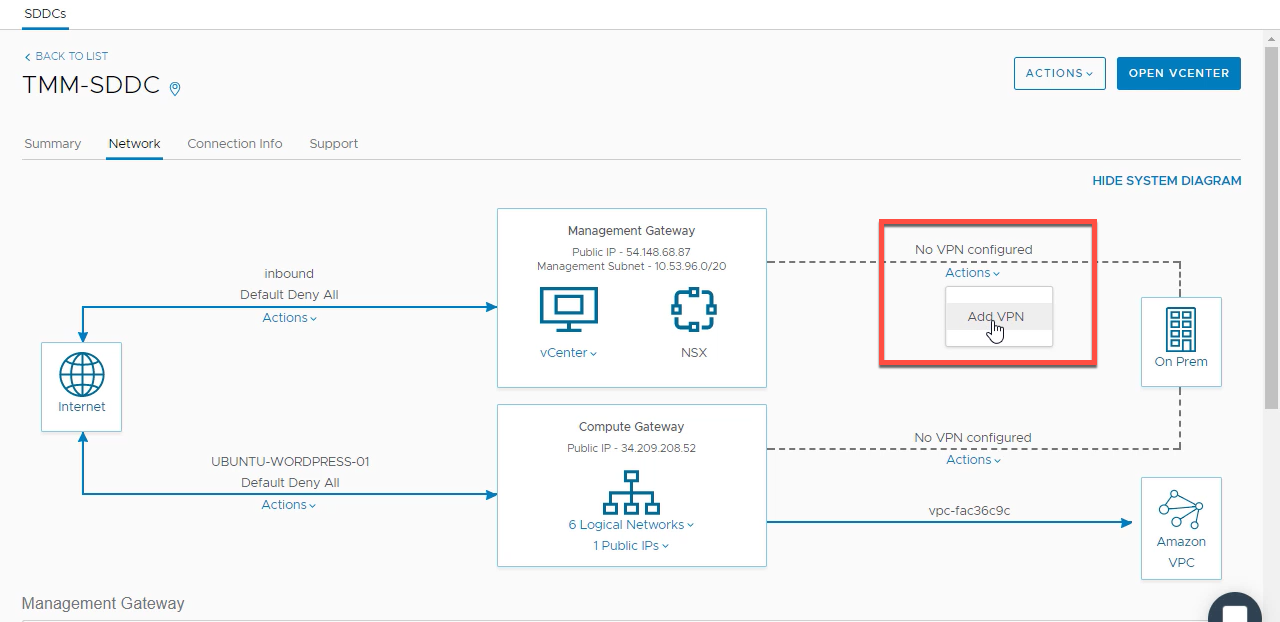
2. By default, the firewall in the VMC console is set to deny all. The assumption here is your on-premises vSphere environment already has the necessary firewall ports opened. Here are the required firewall ports for HLM to properly work:
[table id=13 /]
3. Enter the on-premises DNS server(s) in the VMC management gateway to resolve the on-premises identity source and Platform Services Controller which will be used when configuring HLM.

Note: make sure you can resolve the VMC vCenter Server in your on-premises environment.
HLM Configuration
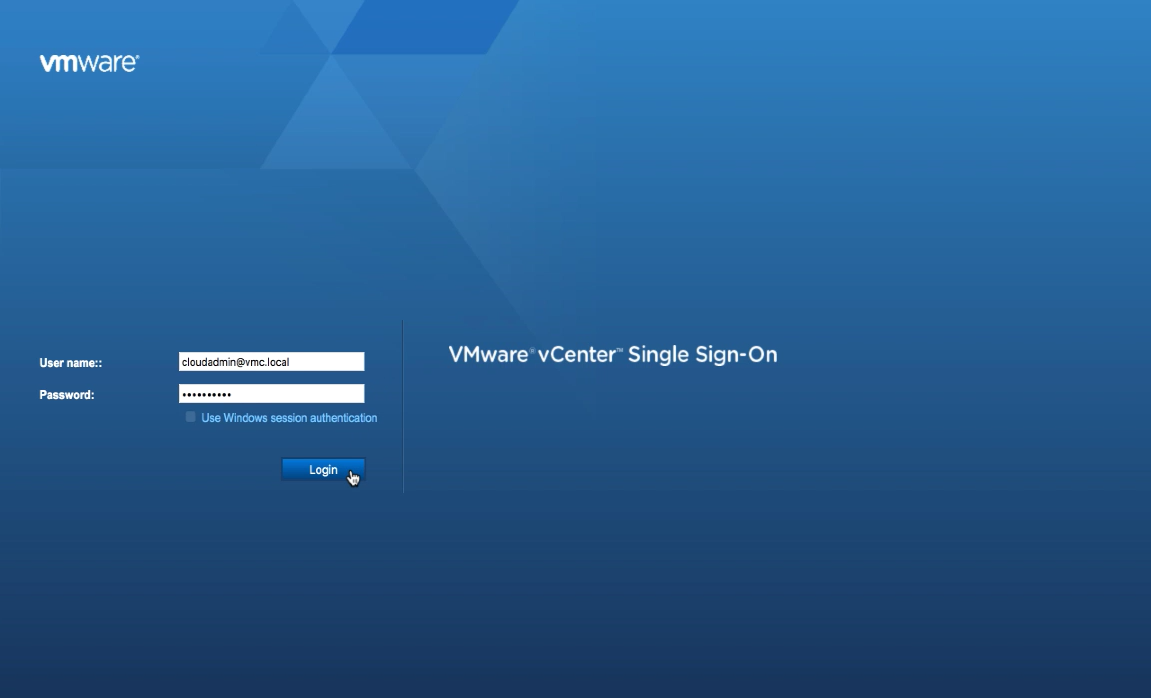
Now that all the prerequisites have been met, the actual HLM configuration consists of three steps.The HLM configuration takes place within the VMC vSphere Client (HTML5) which, by the way, is the only web client available. Login to the VMC vSphere Client using the [email protected] credentials, which is the default equivalent to [email protected] account in your on-premises vSphere environment.
After logging in to the VMC vSphere Client, navigate to the “Menu” option at the top of the screen and select “Administration”.
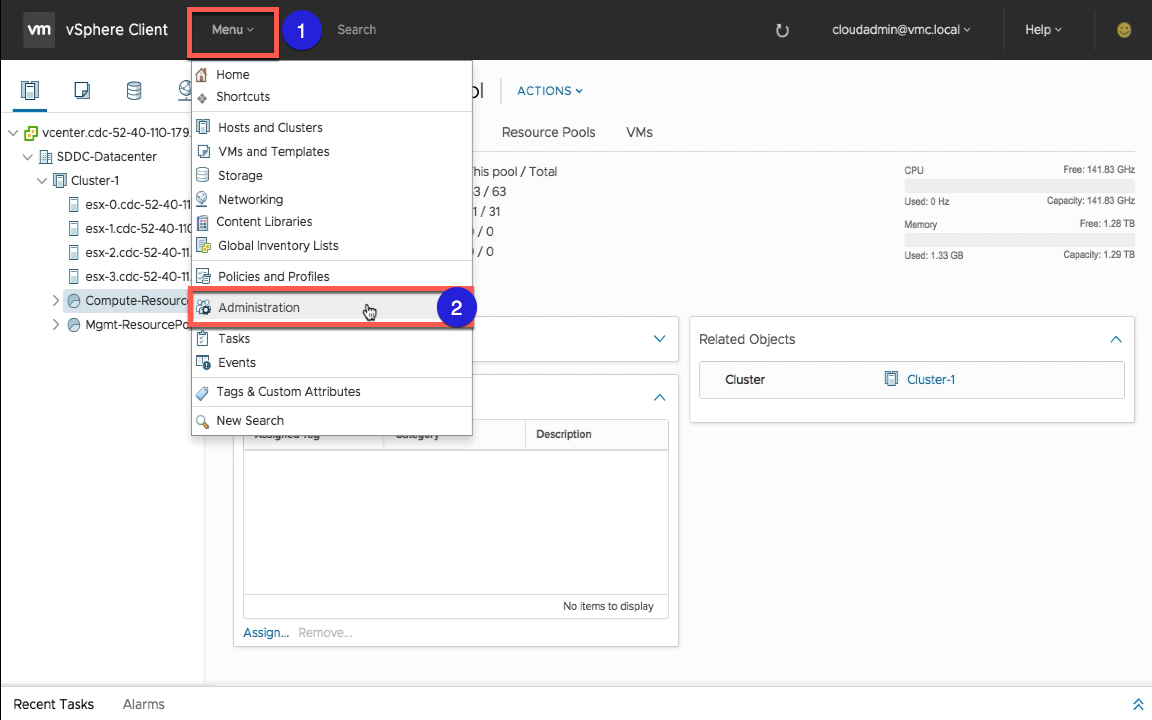
From the right-hand Administration pane go to the “Hybrid Cloud” section and select “Linked Domains”.
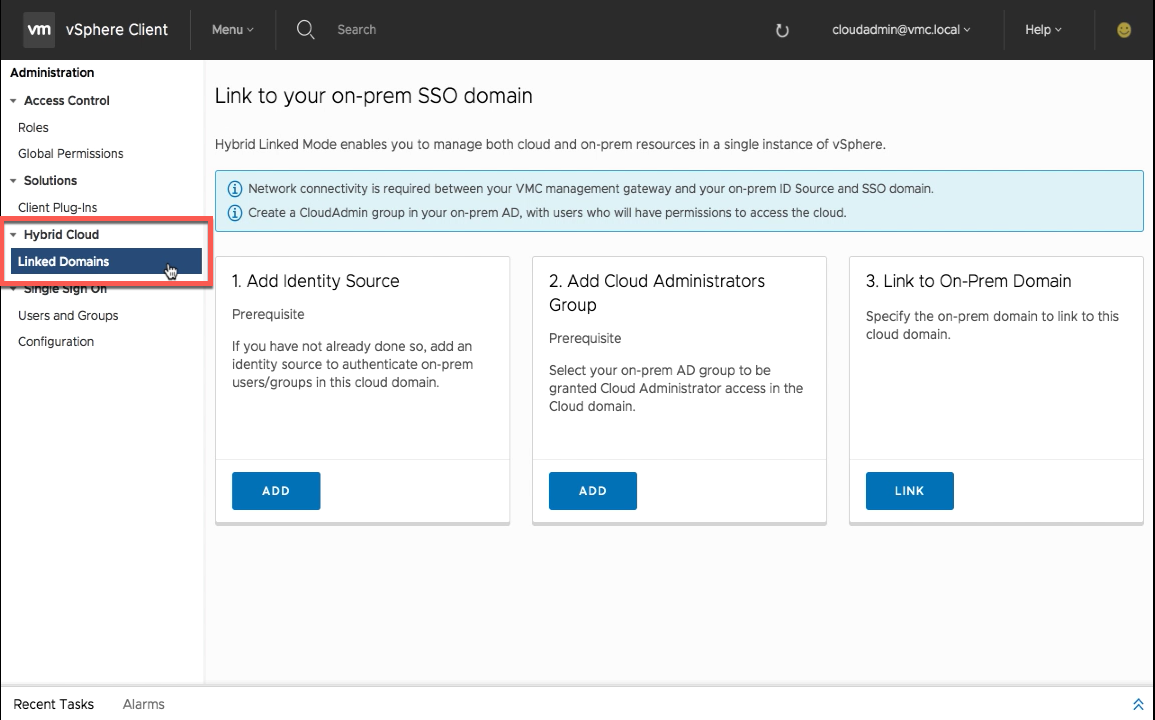
Step 1 – Add Identity Source
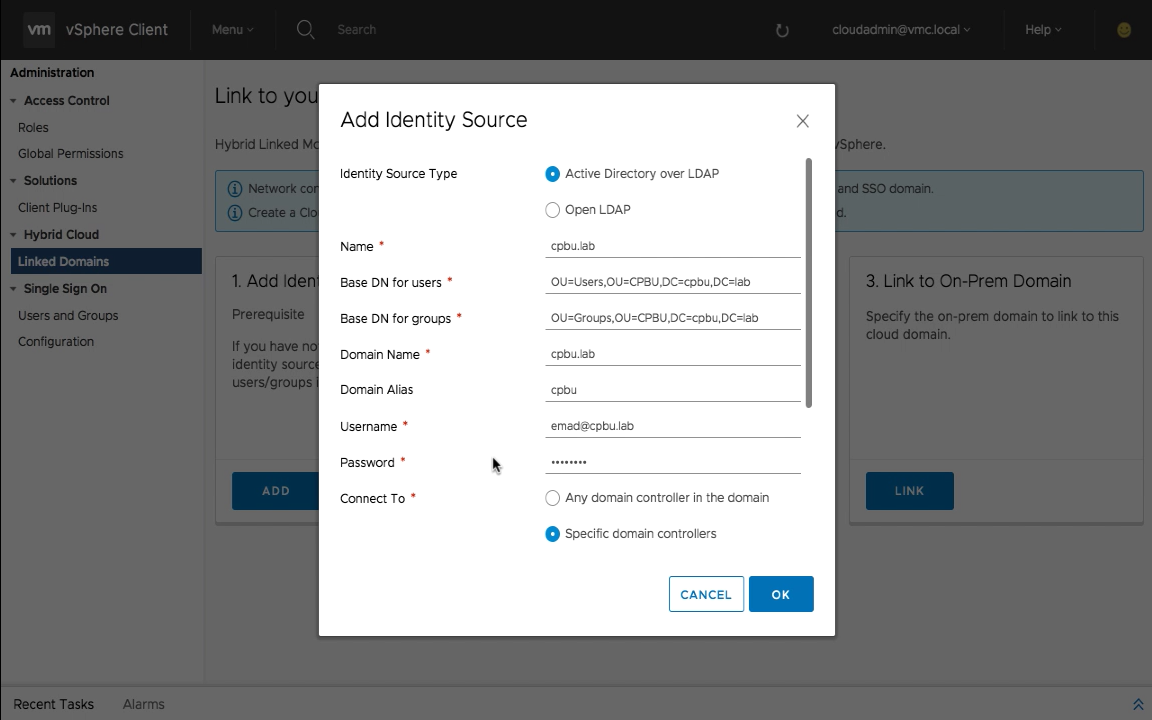
Click on step one “Add Identity Source” and fill out the necessary information about your on-premises identity source. In this example, Active Directory over LDAP is used.
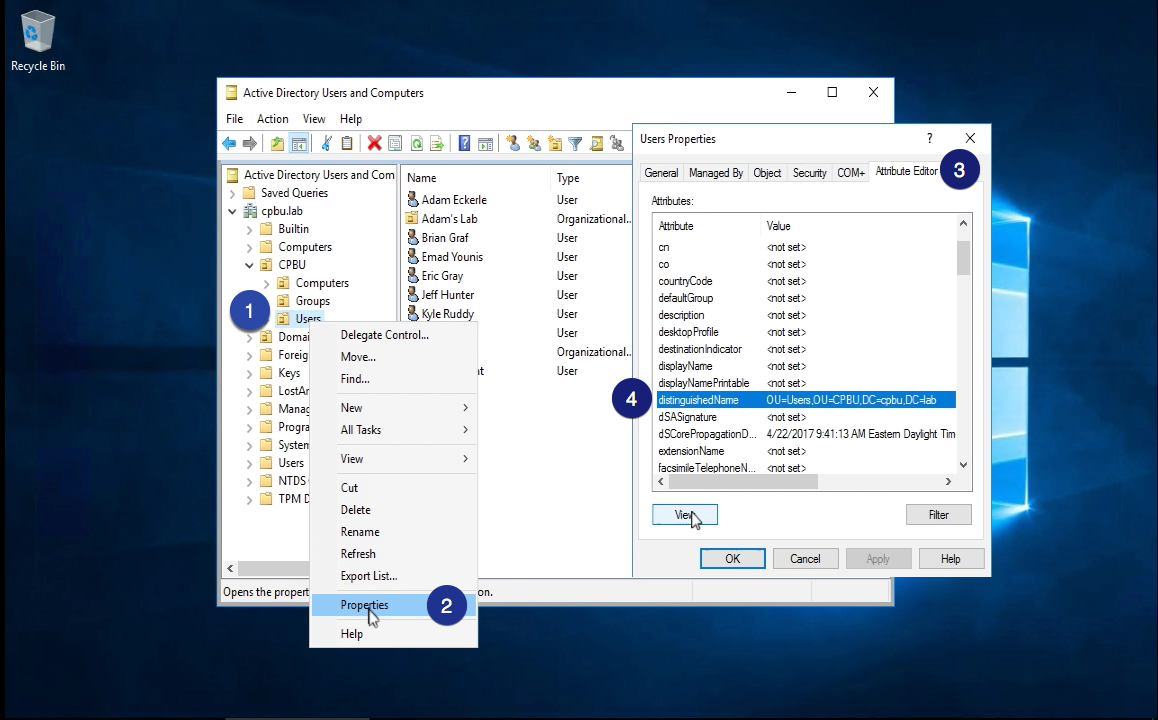
The Distinguished Name (DN) for both users and groups can be found in Active Directory by selecting the “Users” or “Groups” OU –> right click and go to properties –> select the “Attributes Editor tab” –> find the distinguished name.
Note: make sure the correct format is used for the distinguished name for both users and groups.
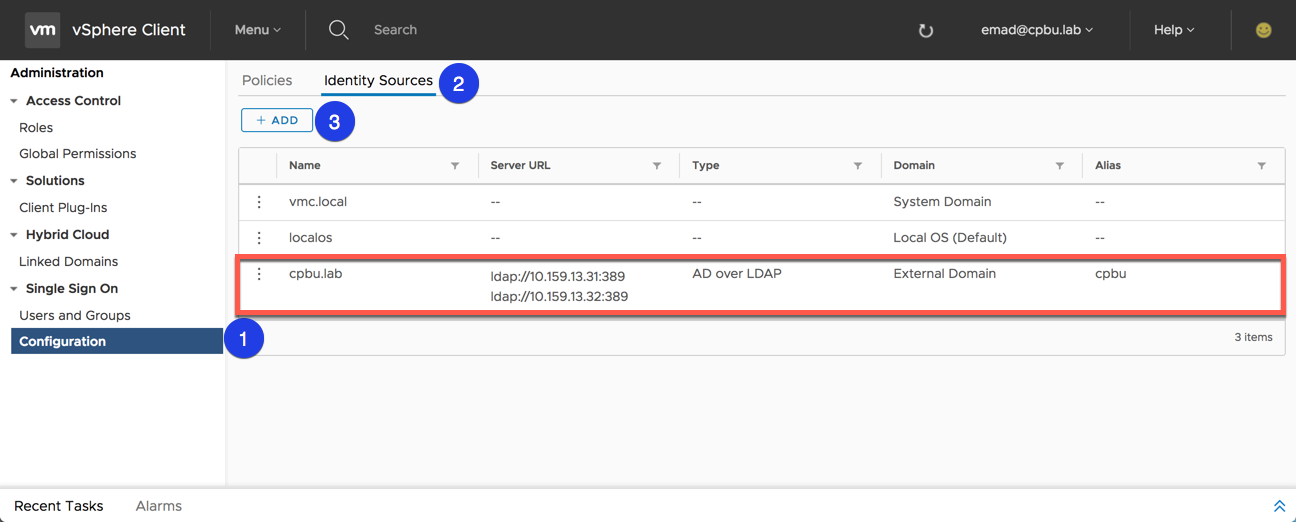
There is also the option to add multiple identity source servers for redundancy if you choose. Only one server is required during configuration, but a secondary identity source server can be added after HLM has been configured. To view what Identity sources have been added or to add an additional identity server go to the Administration menu –> select the Configuration option –> go to the Identity Source tab. Options are also available to edit and remove and existing identity source as well.
After the identity source has been added successfully a green check will appear on the completed step, allowing you to proceed to step 2.
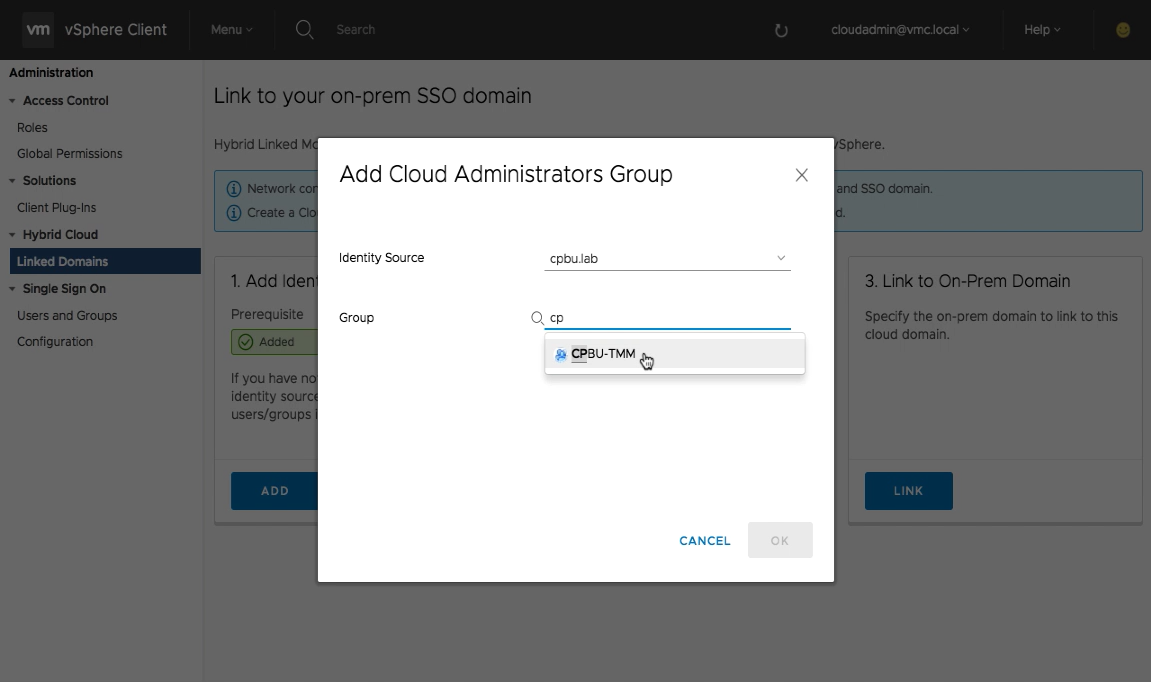
Step 2- Add Cloud Administrators Group
Now that an identity source has been added, the next step is adding the group that will have permission to manage the cloud SDDC. This group can be an existing one or a newly created group of members that are separate from your on-premises vSphere administrators group.
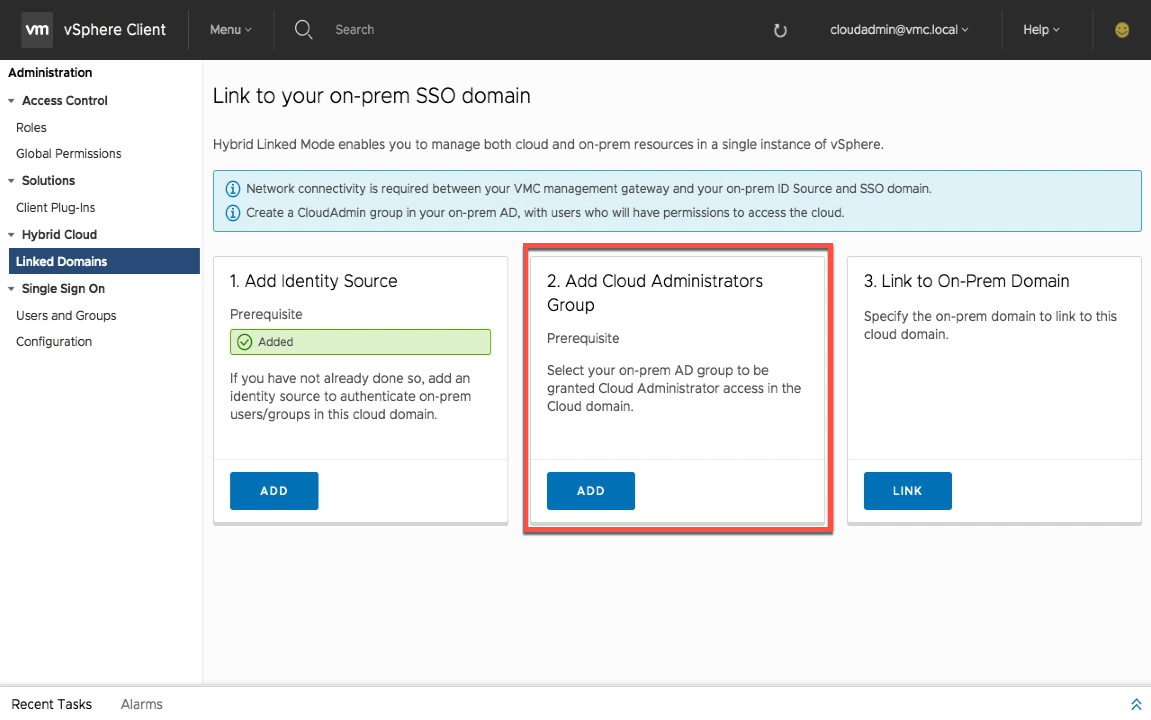
Select the newly added identity source (previous step) from the dropdown menu.
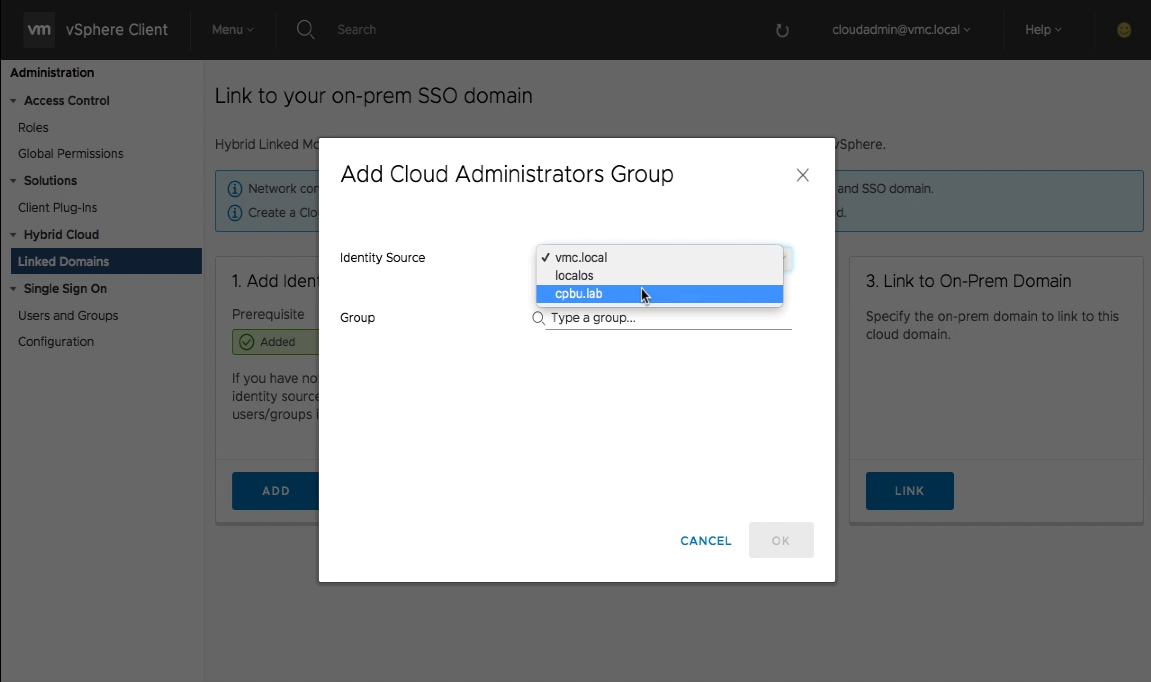
Type or search for the cloud administrators group. Members of this group will be able to login the VMC vSphere Client using their on-premises active directory accounts and manage both environments in a single view. Multiple groups can be added by repeating this process.
The Cloud Administrator’s group has been successfully added and one more step to go!
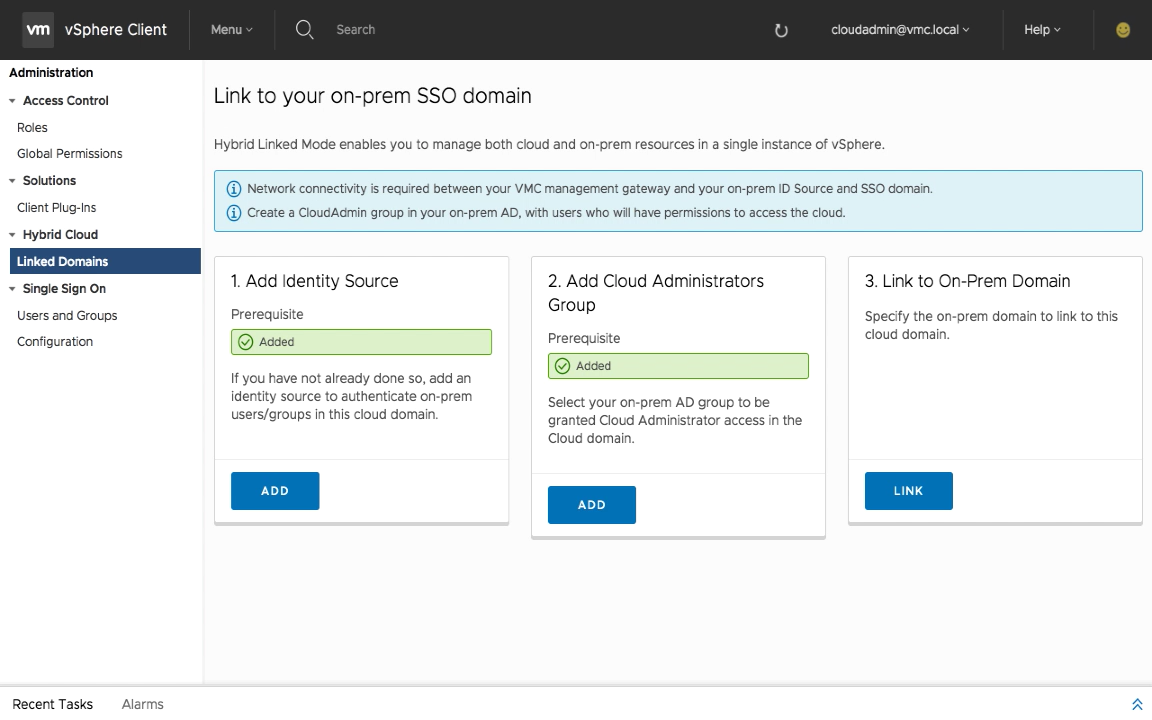
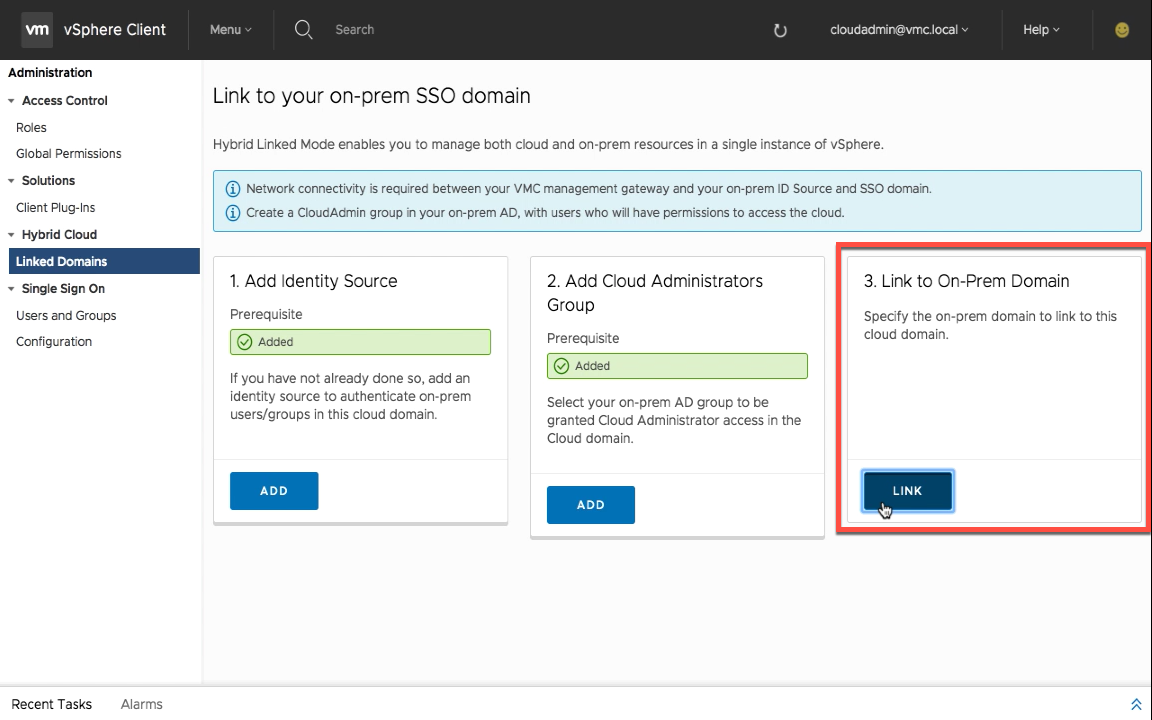
Step 3 – Link to On-Prem Domain
The third and final step is adding information from your on-premises vSphere SSO domain (embedded deployment).
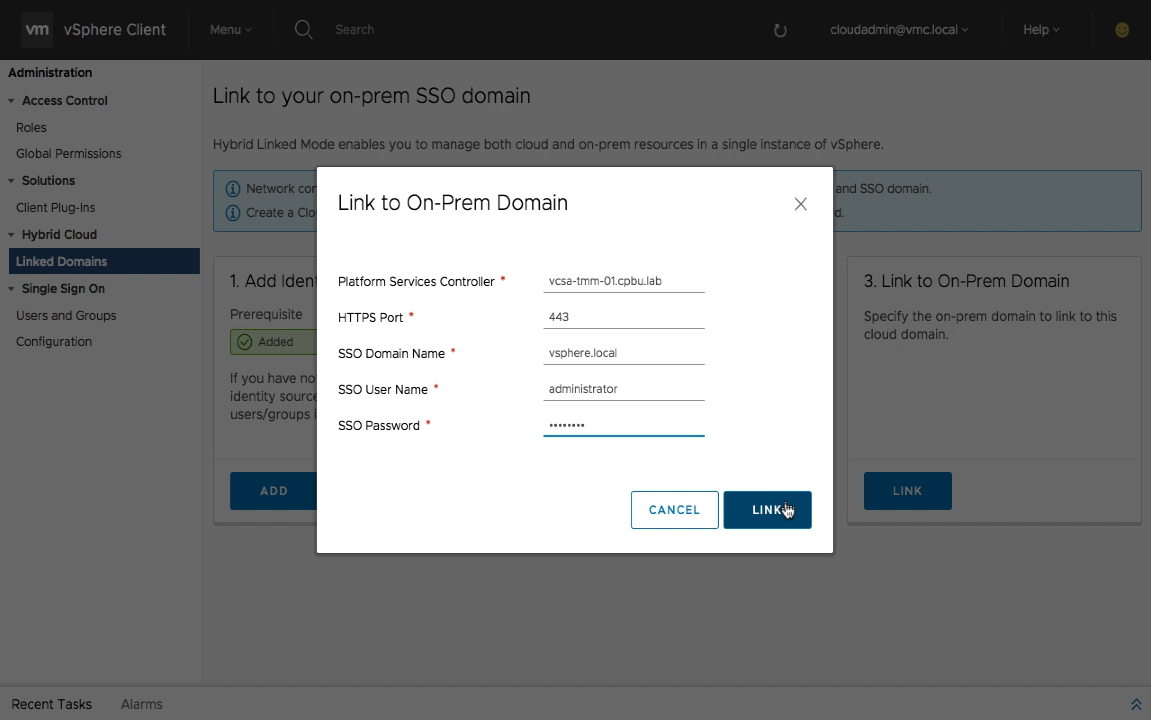
Enter the necessary information which includes PSC FQDN, SSO Domain Name, SSO User, and Password. The HTTPS port is filled in by default using 443.
Note: If you deployed your on-premises VCSA using FQDN or IP Address which is registered with its lookup service, use the same information when filling out this wizard for the VMC PSC name.
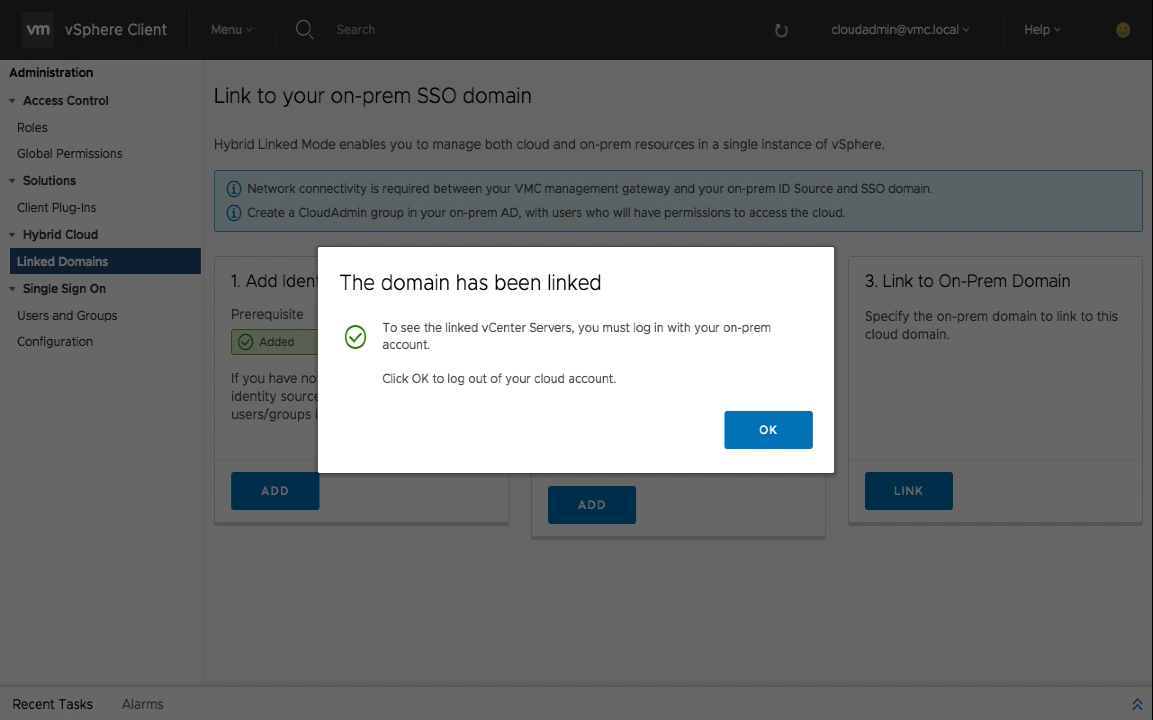
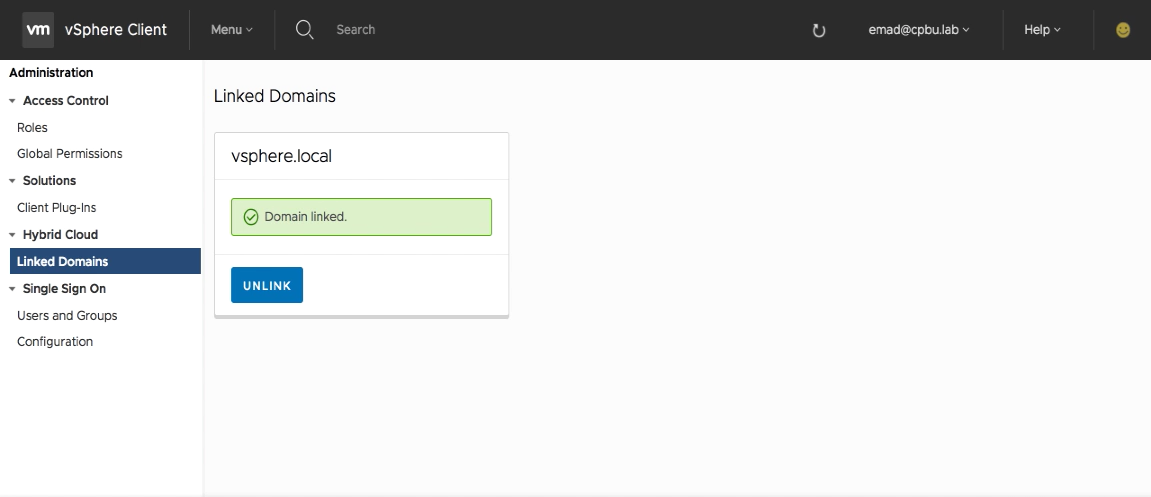
Once the on-premises and VMC SSO domains establish a trust, HLM is now configured and you will need to login with your on-premises credentials. Once you click OK, you will automatically be logged out of the VMC vSphere Client.
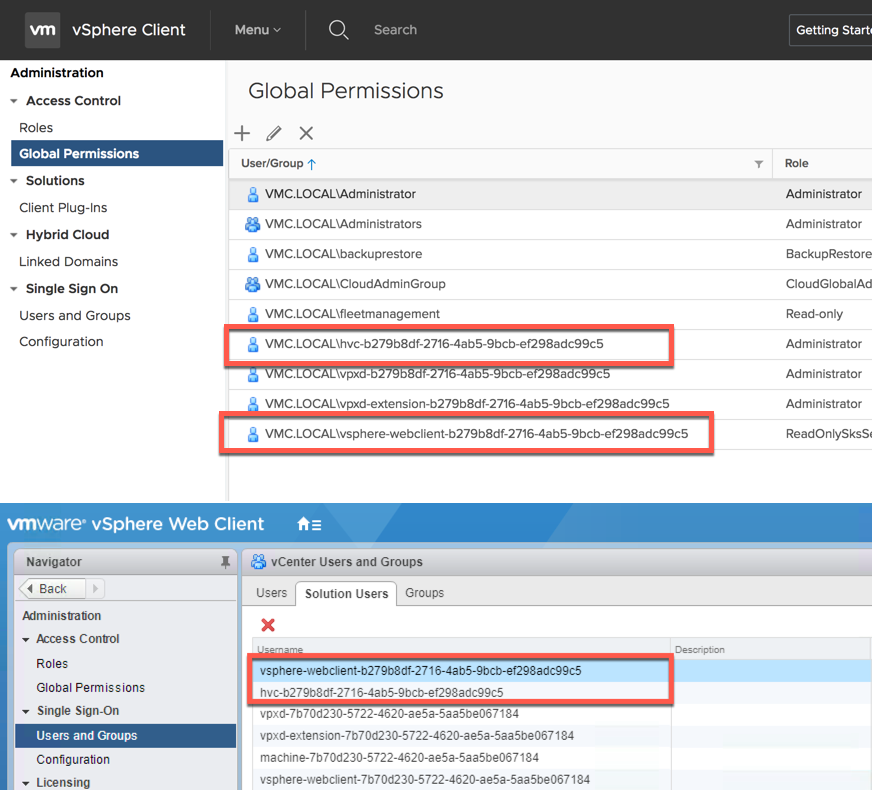
There is a user account and a couple of solution users accounts created by default on the on-premises vCenter Server when HLM is configured. These accounts today can only be viewed in the flash version of the vSphere Web Client and they should not be manipulated in any way as they will affect the communication between your on-premises vCenter Server and your VMC vCenter Server.
synceservice – Local User for HybridVC Service
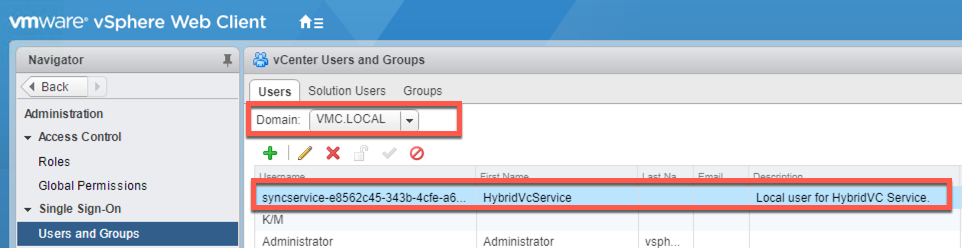
hvc & vsphere-webclient – these solution users match the same accounts in VMC. In the screens below the top screenshot shows the VMC vSphere Client and the bottom screen shows the on-premises vSphere Web Client.
HLM Management
Once HLM is configured log back in the VMC vSphere Client using your on-premises credentials. Using your on-premises credentials is the only way to manage both on-premises and Cloud SDDC using HLM.
Note: User Principal Name should be used [email protected]
After logging in with your on-premises account your greeted with screen showing vSphere domains have been linked. Also on this screen is the option to also unlink at any time.
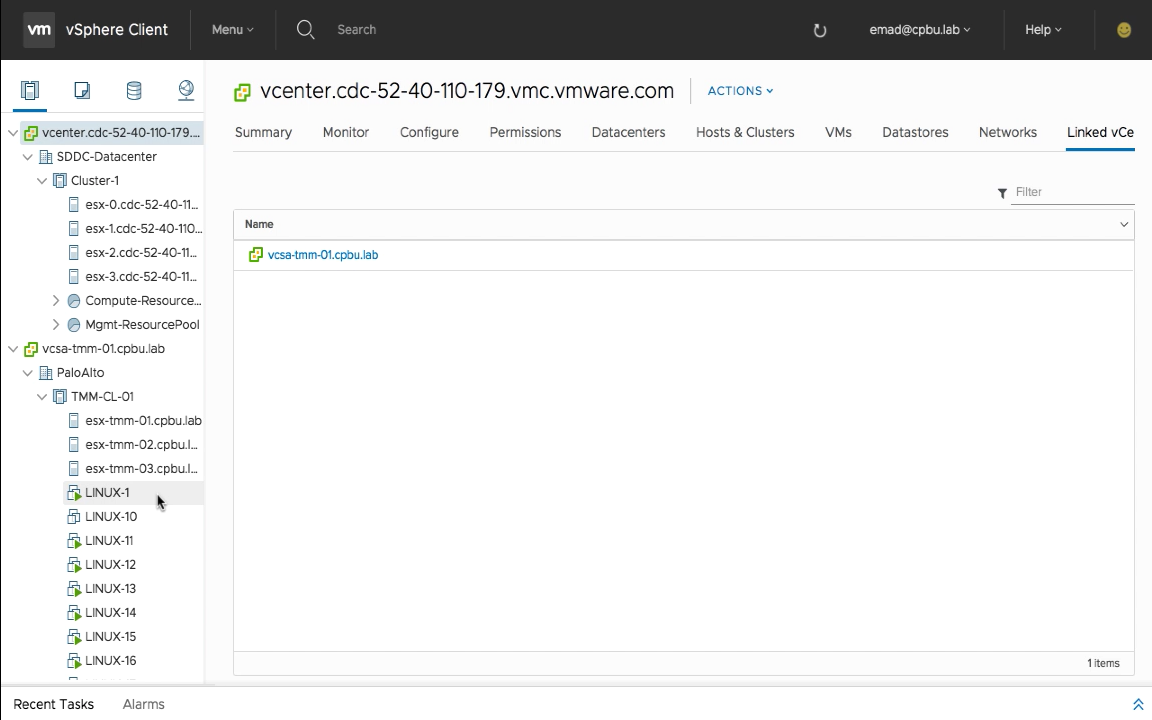
From the hosts and clusters view you can see and manage both your vSphere on-premises and cloud SDDC environments in a single view while retaining separate permissions.
Once all the initial network and firewall requirements have been met, HLM is really only three easy steps. Today HLM can only be established by logging in the VMC vCenter Server with your on-premises credentials, but as I mentioned earlier VMC is a managed service and new functionality will be added at a rapid pace. We can now move workloads via cold migration between our on-premises and cloud SDDC by simply right clicking on a single VM or multiple and selecting migrate. The same wizard that you use today on-premises is present which is another benefit of VMC on AWS. Now your current on-premises vSphere skills translate to the cloud and you can just focus on the important piece – workload management – while VMware takes care of the rest.
You may also take a look at the following video which covers the HLM process as well.